Well, it's almost THAT magical time of the year AGAIN!
is just around the corner!
2 - 4 May, 2025
 |
| Toni Mosley, Blue Bathtub Press |
And that means another opportunity to contribute to
the wondrous and fun
PAY & DISPLAY Vending Machine
by Blue Bathtub Press!

PAY & DISPLAY is an old-school manual vending machine,
revamped by Toni Mosley of Blue Bathtub Press,
to dispense mini-artworks for a mere $2 (2x $1coins).
This fun project aims to create connections within the print community
AND
the money raised is donated to a local charity:
this year's charity is the Kindness Collective.
Last year's PRINTOPIA FESTIVAL was the first official outing
of PAY & DISPLAY and OMG it was such a joyous,
fun project to be a part of!
The combination of the old-school, coins-in-a-slot-and-crank-the-handle experience
PLUS the excitement of who's artwork would be dispensed
was VERY exciting!
To participate I created a selection of mini-artworks,
all by repurposing old prints.

To make my artworks "display ready" I added little folding stands
or actual folding artworks.
This is definitely NOT a requirement but, I thought, a fun little extra.

I also made mini stands for some of the mini prints by other artists
that I received from the vending machine.
 |
| Mini print by Hamish Oakley-Browne with custom mini-stand |
So I thought it was timely to RESHARE my process
on how to make these mini stands!
You can always return to these instructions by clicking
the TIPS button in the menu bar at the top of the page.
If you would like to participate in the PAY & DISPLAY project
contact Toni Mosley of Blue Bathtub Press
via her website and/or social media links.
@tonimosleyart
@bluebathtubpress
To find out more about PRINTOPIA
and the exciting programme of events
visit the website and follow along on social media.
https://printopia.nz/
@printopia_festival
How to Make a Mini Stand
for an Artwork
These instructions are for stands that are sized
to suit my mini prints 70 mm wide x 75 mm high.
Scale and adjust as necessary.
Use a light-weight card, something like
210 - 230gsm is fine for itty-bitty stands.
The larger your artwork, the thicker, or stiffer,
the card will need to be.
For this size stand, cut a rectangle 70mm wide x 75mm high,
or slightly smaller so it will be hidden behind your artwork.
Mark the vertical centre-line.
Measure and rule a horizontal line 20 mm from the bottom.
Measure 25mm either side of the centre line.
*NOTE: it's important to leave approx 10mm border on each side
to maintain strength in your structure
so adjust measurements if necessary.
Measure & mark a point on the centre line 25mm UP from the horizontal line.
NOTE: if you make adjustments, this measurement
must be the same as the measurement either side of the centre line.
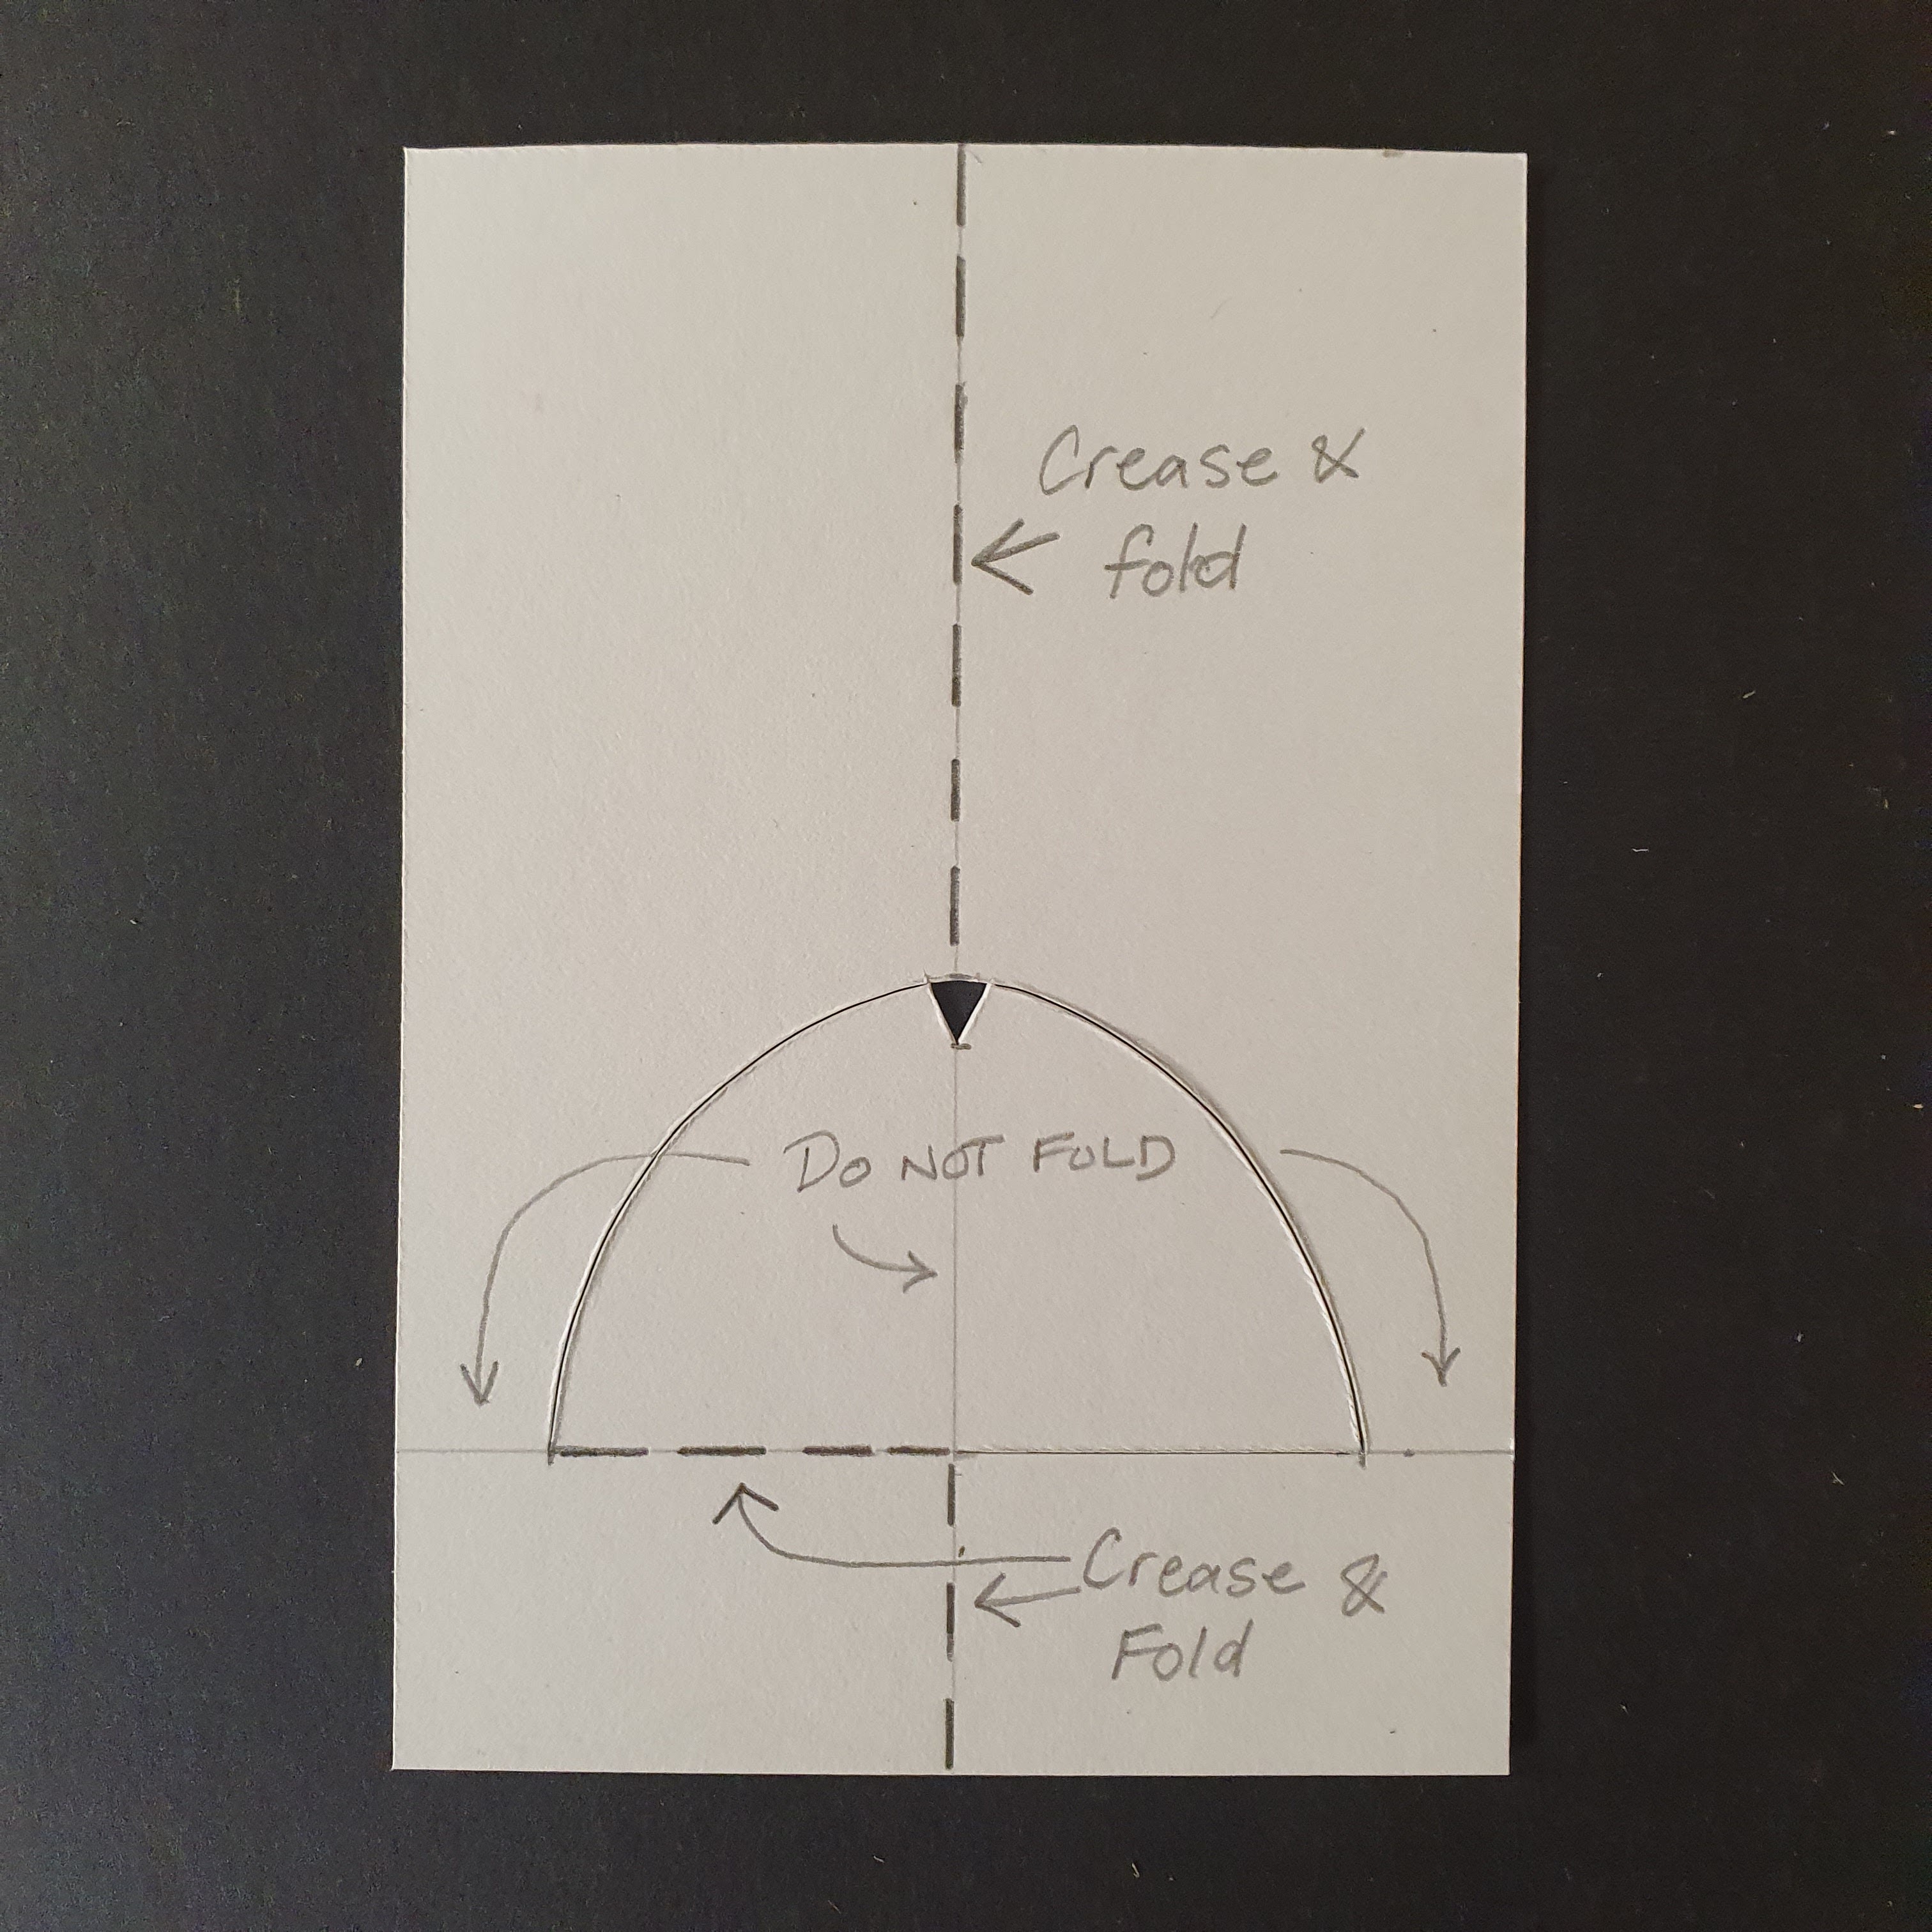
Mark another point 3mm higher on your centre line.
This little EXTENSION is the KEY to your stand being able to LOCK into position.
All will become clear soon!
Draw a semi-circle/half ellipse including the 3mm extension,
as in the photo above.
Cut around the curve and along the
right-hand half of the bottom of the semi-circle, as in the photo above.
Cut a tiny V as shown.
Crease folds, as shown in above photo,
above and below the semi-circle, and along the other half of the bottom of the semi-circle ONLY.
Ideally use a ruler and eg. Thumb nail, credit card or bone folder to crease the folds first.
NOTE: DO NOT fold the semi-circle and
DO NOT fold the border of the frame on either side.
Fold UPWARDS, to 90 degrees / a right angle,
the right-hand half of the rectangle, as shown above.
NOTE: the semi-circle is not folded.
Open your stand out flat again then fold the semi-circle
DOWNWARDS to 90 degrees/ a right angle.
Now you can fold your stand into position to test it.
The tiny V will lock into position and hold the stand open
AS LONG AS you haven't cut away too much.
Glue the stand to the back of your artwork as shown below.
NOTE: the artwork in the photo below is actually
POSTCARD sized so you can see more clearly
how to position your stand.
Centre it vertically on the back of your artwork and line it up at the bottom.
The stand can be the same size as your artwork or it can be smaller.
HOT TIP:
To make your artwork more stable, cut a small triangular wedge from the
bottom of the back flap so that the artwork leans back slightly.
Taaaaadahhhhhhh!!!!
Variation:
I quite like to mount my mini prints on a
coloured card so that it frames my image.
To do this I cut the coloured card, eg. black,
to the size required, in this case 7 x 7 cm.
I then trim my mini prints so they are slightly smaller
so a wee border of black is visible.
Finally, I glue my black stands onto the back of the card.
Below are details of Snaily prints
I have prepared for Printopia 2025.
Have FUN!!
If you make your own little stands I'd LOVE
you to tag me on social media.
I'm so looking forward to PRINTOPIA
and I can't wait to see what artworks I receive
when I pop my coins in the slot and crank the handle!
Thanks so much for visiting!
You can FOLLOW my BLOG by clicking the FOLLOW button
in the top right-hand column to be notified when a new blog is posted.