Saturday 27 July 2013

100 Day Project - Half way!

 Day 50 Yeah-yah! 
Phew! Halfway there.... 

Participating in the 100 Day Project is, on the whole, an enjoyable and positive experience. Having to keep up to date and post things on-line helps to keep me going as it would be all too tempting to let it slide for all the usual reasons - too busy, too tired... Some days are definitely tougher than others and often the hardest thing is deciding what to draw. 

Some positives are I'm rediscovering the pleasure of just sitting quietly and drawing. I find it very relaxing and almost meditative. On "good days" I like to set a challenge. I'm gaining in confidence and I'm learning to trust that I will come up with some inspiration and I will draw something half reasonable.

HERE is the link to the previous post on this project.

Here a few of my drawings from the first 50 days.


Day 9 
Day 25
Day 33
Day 36
Day 37 
Day 39
Day 49


Friday 26 July 2013

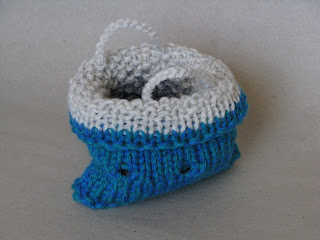
Knitted kete

Nikau
In New Zealand kete are traditionally baskets woven from harakeke or flax. They are beautiful, practical and come in a wide variety of shapes and sizes to suit many different purposes. In Maori tradition they feature in the creation myths as the three baskets of knowledge retrieved by the god Tane. One interpretation of what each basket represents is the basket of light is present knowledge, the basket of darkness is things unknown, and the basket of pursuit is the knowledge humans currently seek. 


Mamaku 
When picking up the knitting needles a couple of years ago, kete seemed (to me) like the perfect choice of something to knit. 

First and foremost they are beautiful, tactile objects. They can also tell a story of place and purpose through the materials they are made from, their shape and their form, and  they can represent the holding and sharing of knowledge. 

I wanted to create a series of kete that spoke of Aotearoa (New Zealand) and my place here. I was also interested in exploring the merging of cultural traditions of European hand-crafts, as passed down to me from my Grandmother, with the traditional Maori form of kete, which I have grown up with and have always loved. The size and scale of the kete is such that they all fit into the palm of your hand. The largest, Nikau is 11 x 12 cm while the smallest, the little green "woven" one at the bottom of the page is 5 x 7 cm. 


Pohutukawa

Pohutukawa II

Paua


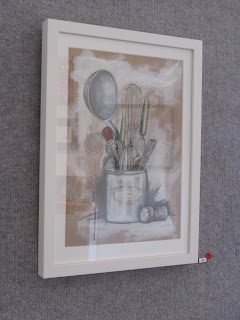
Kitchenalia Drawing


Having recently joined The Upstairs Gallery as a member I took the opportunity to enter a drawing in their Members Exhibition "Draw". It was a lovely bonus to see a red dot on my number when I turned up at the opening. To think, I almost chickened out of entering it.


I wanted to do something a little different from my previous work and I also wanted to do something that was likely to be different from other people's entries. Media used are brown paper, gesso, soft graphite pencil and found collage papers including a piece of red gift wrap, a scrap from the yellow pages phone book, the inside of an envelope for the blue of the ladle, old graph paper and scraps of an old ledger page for the jar.


Thursday 25 July 2013

Mangle update


The old 1908 Ewbank mangle is transforming into a printmaking press. 
VERY exciting! 

The old wooden rollers have been sleeved in steel tube, the rusty old mangle parts have been cleaned up, painted and reassembled and arms have been added to hold the runners for the bed. 
Next step is making wooden runners to support the bed, and ... getting a bed. I priced up a laminated plastic one but... woah, the price is very scary so I think I am going for a steel bed at a fraction of the cost. 
Don't worry, I'll put stoppers on it so I can't amputate my feet.

I ran a test drypoint print through it in the weekend and it's looking like it's going to be a little humdinger!

Thursday 11 July 2013

Illustrations for TABS & PND Wellington

In 2004 I created this image for the organisation TABS - Trauma and Birth Stress, to illustrate some of the feelings of a new mother having survived a traumatic birth experience. A black and white line drawn version was used for their handbooks.


This is a series of illustrations I did for the Post & Ante-Natal Distress Support Guide booklet in 2005.


Tuesday 9 July 2013

Gelatin Printing


Gelatin printing is a technique of creating monoprints using a slab of gelatin as the printing plate. 

You never know quite what you will get so you have to be spontaneous in your approach and ready to make the most of the happy accidents. This is a very different way of working for me so I enjoy how freeing it is.

I use water soluble paints which I roll onto the surface of the plate. I then lay items onto the gelatin surface to create impressions in the paint surface. The gelatin is delicate and you don't want anything that will pierce the surface so fresh leaves are better than dried, crunchy leaves. Items that I have found to work the best for my style of working are organic materials such as leaves, flowers, feathers and seaweed. Fabrics such as lace and hessian create interesting results. Stencils can be made with paper cut-outs or torn paper. 

I always begin with a plan of the effect I am trying to achieve and so choose a palate of colours that will work well together. The colours print transparently so you need to think about how one colour will affect the next. I like to layer images and textures and to use masking techniques to retain some areas, while layering up other areas.

With this series of prints I was inspired by the ebb and flow of the tides and how detritus is left behind as the tide recedes, sometimes layering up on what has gone before. To give a greater sense of layering to the initial monoprints,  I added some collage elements and detailing with an Ink-Tense colour pencil. I have also added a relief print to the surface of some.


Monday 8 July 2013

Crocheted Nudibranch


The idea for creating these began when I wanted to send a birthday present to a good friend of mine in the UK. She is a keen diver and a Nudibranch lover. If you check out the link, you'll see why - they are gorgeous, magical wee creatures and there are so many variations. 


Chromodoris elizabethina
So, I began by making one for my friend. I thought it would be more fun if it was able to be worn or be interactive in some way so I made it as a finger puppet. There are many patterns on the internet for nudibranch, believe it or not, but I prefer the challenge of making it up as I go along. Of course, when I finished the first one, I couldn't stop there. I had to make one for myself.  Then I couldn't resist making another design and then another.... There are so many colour, shape and pattern variations in nature that it's like trying to choose between lollies in a sweet shop. 


Hypselodoris apolegma


I started with relatively simple designs and I initially kept them all a similar size, as one-finger puppets. Gradually, however, I wanted to be able to add more detail so I needed to increase the size of them.

Chromodoris kuniei
Hermissenda crassicornis


Nembrotha kubaryana


This one is slightly larger and is a two-finger puppet. Additional detailing is added with embroidery.

I try to be accurate with colour combinations and main features so that they are recognisable against their real-life models.


Hypselodoris kaname


Hypselodoris Bennetti
Of course I got more ambitious and wanted to be more accurate and so the next one was even bigger still. This one is a hand puppet and so it took a lot longer to complete but it is very interactive and fun to play with. It has also given the anemone, that I created "accidentally" while experimenting with knitting techniques a couple of years ago, something to hang out with.


Thursday 4 July 2013

Restoring and repurposing an old mangle to use as a printing press


I recently found this old 1908 "Little Giant" mangle in at Junk and Disorderly in Auckland, looking a little sad and lonely but with possible hidden talents. I'm hoping we can get it up and running as a press suitable for dry-point. 

(I have another old mangle that I use for small relief printing. It was passed down to me from a family member who was a known NZ printmaker in the 60s & 70s and I have always treasured having it, though I only began using it a year or so ago when I finally began learning printmaking skills.)

On consulting my technician (hubby), and getting his reassurance that he would indeed like a project of this ilk, we purchased the wee beast and bought him home.

Within moments, a sign of my hubby's eagerness (at the time), and with barely a chance for me to document it's initial state of being, he had it stripped down and in pieces. (Unfortunately this meant I didn't get very good before photos.)

Some of the quirky features are: the folding crank handle, the carry handle and the  marking gauges on the screws.


The wooden rollers are in good condition. Hubby's plan is to have them cased in steel by a local engineering company.  In fact everything is in pretty good nick - nothing a wire brush and a lick of paint can't deal to. This is a project that will take time but, hopefully, it will be worth the wait.
The cogs pre-cleaning


Cleaning up the pieces


How gorgeous are those cogs!
Painting some of the many pieces