Showing posts with label upcycling. Show all posts

Wednesday, 16 October 2019

How Can Cans be a Book?


"Depth in Metres" artist book by Toni Hartill


Initial ideas for this wee tin can tinkering came about when I was working 
towards the "Scattered" group exhibition earlier in the year.

I found myself making mini-dioramas inside little folded boxes 
and in tuna and sardine tins. Yep, one minute I'm printmaking... next, I'm making mini imaginary worlds in old food tins... it happens.


Dioramas made for "Scattered" group exhibition by Toni Hartill


Tin can dioramas by Toni Hartill


Having accumulated a wee cluster of cans I then began 
playing with ideas of how these could become a "book".

As I was planning on working towards the PCANZ Thinking_Unfolding artists book exhibition later in the year I suppose this was the beginnings of my own thinking unfolding. One of the aims of the PCANZ exhibition was to challenge and explore what it is that makes an art object an artist's book.


I began playing with the notion that a book may:

tell a story, 
record an event,
be a diary,
has pages and chapters that reveal new information,
is open to interpretation depending on the audience...


Each of these little dioramas could be another chapter in my "story" 
or perhaps it could be a diary or a ship's log...?


"Depth in Metres: artist book by Toni Hartill


Next I'd need some way to contain my chapters or pages, as in a book cover...??

I toyed with various receptacle ideas but wanted to choose a structure that was relevant to the charts used so I settled on the simple structure of an old rolled chart/map into which the stack of cans would fit. I even decided to leave the old cotton ribbon, that I had used when gluing the tube, as it seemed fitting to leave it there.


"Depth in Metres" artist book by Toni Hartill


Scroll on to see the making of "Depth in Metres".


I was pleased with my end result of this "slight" diversion from what I was supposed to be working on at the time... and wanted to push the idea further to create a larger, more "sophisticated" version of this concept with a view to it being my entry for the Thinking _Unfolding exhibition.


My entry would also need to include printmaking as this version is made entirely of upcycled charts.


To see how this idea developed into my entry 
please return to see my upcoming blogs about my artist book "Vitamin Sea".

(Search in the "Exhibitions" list under "Thinking_Unfolding" 
or click on the "Artist Book" tab in the toolbar above.)


"Vitamin Sea" artist book by Toni Hartill


The Making of "Depth in Metres"


Stay tuned for new post coming soon!

"Vitamin Sea" artist book by Toni Hartill


Wednesday, 5 April 2017

Ye Olde Mangle revisited:construction of the bed


I regularly get inquiries about how my mangle was converted to a printing press.
The short answer is, I asked hubby if he was up for a challenge, he said, "you bet!" and next thing (sort of) I had a converted mangle ready to go!

To read the longer version of the conversion with accompanying photos 

Further to previous info however, I am frequently asked how certain aspects of the mangle were dealt with, in particular how the bed was attached to the mangle. There were no "plans" to speak of, it was just a case of "make it up as you go along" and trial and error.

So, here goes an attempt at an explanation:


This first pic was taken before the wooden runners were added. It shows how L-shaped metal sections were added to support wooden runners which the bed will slide along.


There is one shorter length which runs through under the mangle and is bolted to the frame of the mangle on both sides and beneath the rollers as seen in this next photo. (This section has the right-angle facing downwards and towards the rollers. )

Two shorter sections are then bolted, one on either side of the rollers, to the lengths of metal beneath it, this time the right-angle facing upwards and again towards the rollers. 


Rimu runners are bolted to these L-shaped metal supports, stopping just short of the bottom roller. The top of the wooden runner is flush with the top of the bottom roller. 


The bed (in my case laminated hardboard continues to work just fine) glides along these runners.

Four threaded rods are used to hold everything square from one side of the frame to the other, two in the base of the mangle, one at each outer end of the metal bed runners.


There has been some on-going tweaking happening in regards to the tension of the springs.

 The best tip I learned however that has helped me the most in setting up the mangle to print successfully in a number of print mediums is the use of runners of different thicknesses to hold the rollers apart to the desired amount. Unlike a printing press where the rollers are raised and lowered to set the pressure and/or clearance for different thicknesses of plates, the mangle is sprung so even if you release the pressure the rollers are still sitting firmly on the bed. This is where runners come in! I have a selection of runners of different thicknesses that I insert under the top roller meaning I can go from printing monotype surfaces, drypoint and etching to linocut or woodcut with a quick change.


Hope this info is helpful for those lucky enough to find an old mangle to give new life too.


Here's a wee pic from a visitor to my blog, 
of a converted Ewbank mangle, a lot like mine, 
apparently rescued from being sent to the dump! 
Whew! 


Cool idea for a different way to make the bed - could allow for extra storage too.


I'd love to see/ hear from you 
with any images of your mangles 
before, during and after their make-overs!


Friday, 6 September 2013

Mermaid spoons


This is my response to the lovely wee Mermaid spoons I saw online on Frankie Magazine a while ago.My window sills and decks are strewn with many beach combing treasures that follow me home so I'm wrapped to find a creative outlet to use them.


Monday, 12 August 2013

It's a Printing Press!


It works!
I am making-do with a laminated hardboard bed for now and I'm very happy with the results I'm getting so far. I've trialled it with printing a plexi-plate dry point with chine colle added and have also just given it a whirl with a "Kitchen Lithography" technique using aluminium foil and a chinagraph pencil drawing. 

Inked up plexi-plate with collage elements laid on ready to print.


Trial print using "Kitchen Lithography" technique.

Friday, 26 July 2013

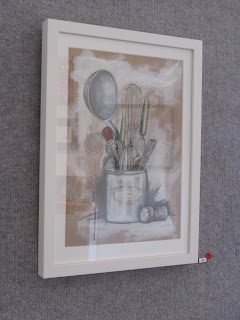
Kitchenalia Drawing


Having recently joined The Upstairs Gallery as a member I took the opportunity to enter a drawing in their Members Exhibition "Draw". It was a lovely bonus to see a red dot on my number when I turned up at the opening. To think, I almost chickened out of entering it.


I wanted to do something a little different from my previous work and I also wanted to do something that was likely to be different from other people's entries. Media used are brown paper, gesso, soft graphite pencil and found collage papers including a piece of red gift wrap, a scrap from the yellow pages phone book, the inside of an envelope for the blue of the ladle, old graph paper and scraps of an old ledger page for the jar.


Thursday, 25 July 2013

Mangle update


The old 1908 Ewbank mangle is transforming into a printmaking press. 
VERY exciting! 

The old wooden rollers have been sleeved in steel tube, the rusty old mangle parts have been cleaned up, painted and reassembled and arms have been added to hold the runners for the bed. 
Next step is making wooden runners to support the bed, and ... getting a bed. I priced up a laminated plastic one but... woah, the price is very scary so I think I am going for a steel bed at a fraction of the cost. 
Don't worry, I'll put stoppers on it so I can't amputate my feet.

I ran a test drypoint print through it in the weekend and it's looking like it's going to be a little humdinger!

Thursday, 4 July 2013

Restoring and repurposing an old mangle to use as a printing press


I recently found this old 1908 "Little Giant" mangle in at Junk and Disorderly in Auckland, looking a little sad and lonely but with possible hidden talents. I'm hoping we can get it up and running as a press suitable for dry-point. 

(I have another old mangle that I use for small relief printing. It was passed down to me from a family member who was a known NZ printmaker in the 60s & 70s and I have always treasured having it, though I only began using it a year or so ago when I finally began learning printmaking skills.)

On consulting my technician (hubby), and getting his reassurance that he would indeed like a project of this ilk, we purchased the wee beast and bought him home.

Within moments, a sign of my hubby's eagerness (at the time), and with barely a chance for me to document it's initial state of being, he had it stripped down and in pieces. (Unfortunately this meant I didn't get very good before photos.)

Some of the quirky features are: the folding crank handle, the carry handle and the  marking gauges on the screws.


The wooden rollers are in good condition. Hubby's plan is to have them cased in steel by a local engineering company.  In fact everything is in pretty good nick - nothing a wire brush and a lick of paint can't deal to. This is a project that will take time but, hopefully, it will be worth the wait.
The cogs pre-cleaning


Cleaning up the pieces


How gorgeous are those cogs!
Painting some of the many pieces